

How To Draw A Realistic Eye Step By Step For Beginners
- Home
- Portrait Drawing
- How to Draw Realistic Optics
How to Draw Realistic Eyes
A Stride past Footstep Tutorial
Interested in learning how to draw realistic eyes? I don't blame y'all! The 'windows to the soul' are a captivating subject field matter. In this tutorial, I will demonstrate the process of drawing a realistic eye, and illuminate some of the cognition and skills that one must acquire to draw this compelling subject matter assuredly.
After the lesson, don't miss these centre-related pages ...
6 Most Mutual Eye Drawing Mistakes and how to avert them
How to Draw Realistic Eyebrows
... and these tutorials on drawing the other facial features:
How to Draw Realistic Lips
How to Describe an Ear on Toned Paper
I volition exist using Staedtler Mars Lumograph graphite pencils (HB, 2B, 4B) on Strathmore 400 Series Cartoon Paper.
 Animated GIF of the tutorial steps
Visible Anatomy of the Eye
To draw this discipline thing assuredly, not only do you lot need an splendid understanding of the drawing process (which you can learn in my free Mini-Course), just additional layers of noesis pertaining to the anatomy and structure of the heart as well.
Though I will cover middle beefcake and structure in detail in a future lesson (and an upcoming video form), hither are some of the anatomical terms that I will be using throughout this tutorial:

Though this is not a consummate list of the features of the centre, these are the ones that are most visible in this pose.
Before we brainstorm, it'southward advisable to first analyze the structure of the middle in it's current pose past drawing a structural diagram. This allows you to make up one's mind: What features of the centre tin can you meet? Which ones are obscured? Where are the important overlaps? (No idea what overlaps are? Scout Lesson 4 of my free Mini-Course!) What areas do y'all need to focus on or emphasize in society for the eye to read as a convincingly iii-dimensional grade? A structural diagram tin respond all of these questions and more.
How to Draw Realistic Eyes
Analyzing the Structure of the Eye
What I look for and notice while observing the eye in this pose:
- This is not a direct-on view of the face or the eye. The model's head is turned near 3/4 to her right, but she is looking directly at us, causing an uneven distribution of the white of the heart on both sides of the iris. This allows us to see a larger portion of the inside of the elevation eyelid than we would see in a directly-on view. I have exaggerated this slightly in my structural sketch, though this is very subtle on the model, and manifests as a deep shadow.
- The model's head is besides tilted downwardly. This allows us to see the entire top plane of the lower eyelid, and is going to be an important chemical element to emphasize in my drawing in club to create the proper perspective, and the illusion that the eye is looking out from nether the brow ridge. (Not indicating that each eyelid has two planes is one of the about common mistakes that detract from the realism of an eye cartoon!)
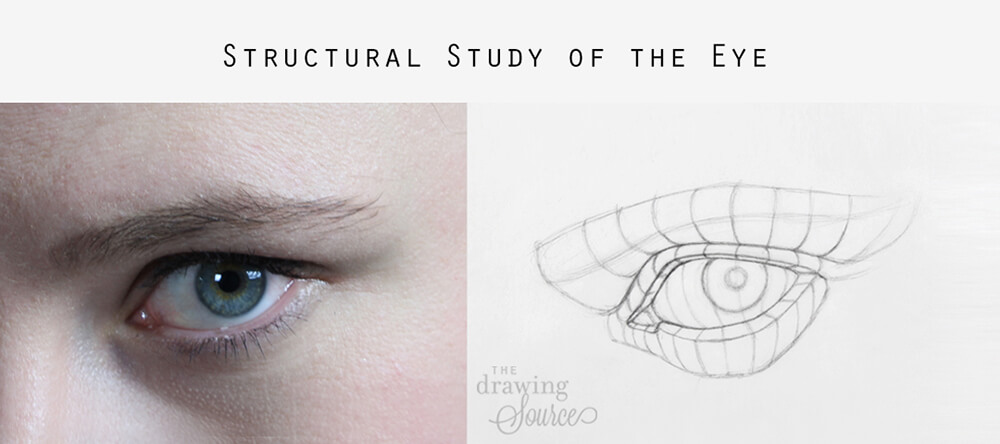
Finally, whenever we draw an eye, we need to think that the eyeball is a sphere, so the features of the middle need to be drawn in a style that emphasizes that they are curving effectually a sphere.
Equally you learn more nearly this subject matter, you will be able to conduct this analysis visually instead of on paper. Nonetheless, even when it's not essential, drawing a structural diagram is an fantabulous exercise that always helps me notice more than when I comport my analysis visually.
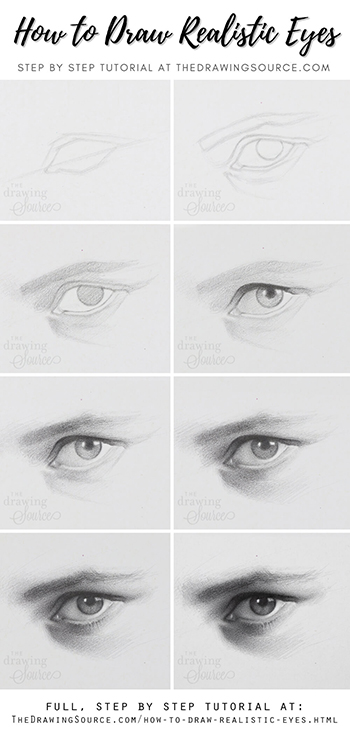
Download a high-resolution
infographic of this tutorial here!
How to Describe Realistic Eyes
Step one: Starting the Eye Cartoon

There are two ways in which I tend to begin eye drawings:
Method 1 for Starting an Eye Drawing: Working from the outside in
When working from the exterior in, I start by creating an envelope, or a general shape around the entire middle socket area. I then divide up this full general shape into smaller, more specific sections (the eyebrow, the centre shape, and the shadow shapes). For a more than detailed tutorial on using the Envelope method to beginning a drawing, check out Lesson two of my free Mini-Grade.
Method 2 for Starting an Eye Cartoon: Working from the inside out
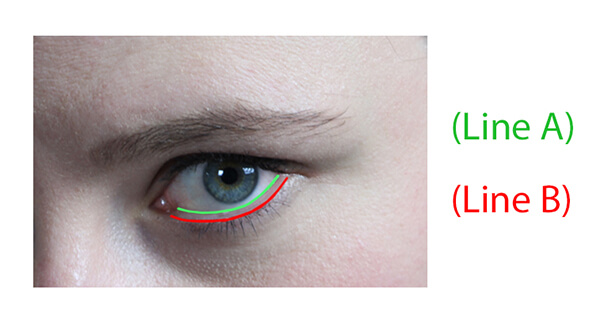
When working from the within out, I begin with the innermost shape of the eye. This means that I'thou indicating the lines that define the part of the eyeball that I can see. Notice that the bottom line that I'grand drawing is Line A in the epitome below as opposed to Line B. Line B may be more evident since information technology is emphasized by the eyelashes, merely inconvenient to start with since I would take to leave the correct amount of room for both the eyeball and the top airplane of the lower eyelid.
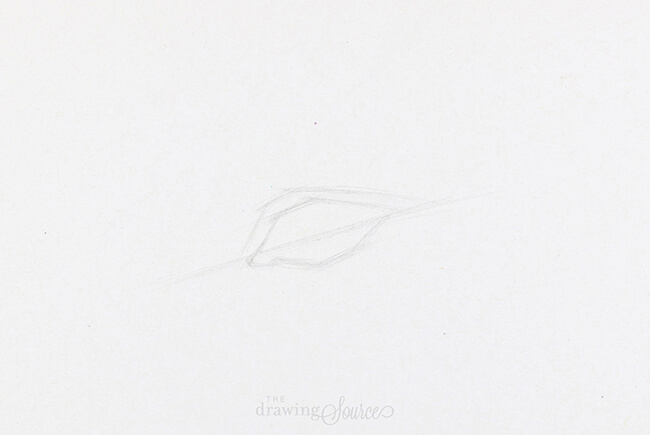
Looking at my initial pencil marks below, notice that I'g not cartoon a curved almond shape, which is the shape normally considered to exist an 'centre shape'. Instead, I'm looking for angle changes that I tin can indicate.
There are at to the lowest degree three bending changes in both the summit line and the bottom line. Indicating these, and keeping them in mind throughout my drawing, will aid me represent this particular eye, and add a sense of realism to my drawing. The more than specific we tin can become, the more realistic our cartoon will seem.
Finally, notice the axis line that I drew to assist me found the correct tilt of the center.
 How to Depict Realistic Eyes: Step 1
How to Draw Realistic Optics
Step ii: Completing the Block-In
Whichever way I brainstorm my drawing, the goal is to get to this signal.
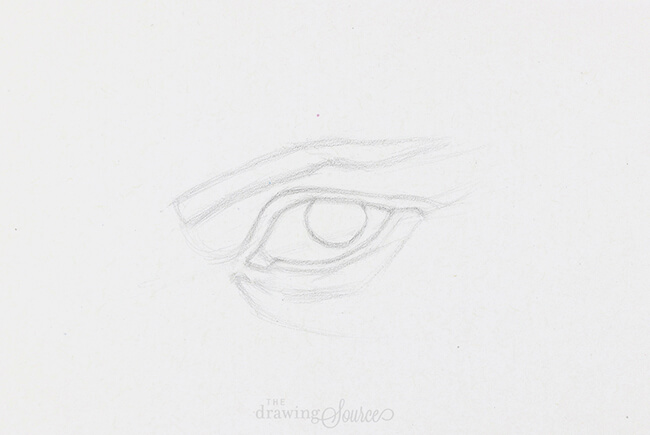
In this image I have completed my cake-in (also known as a line drawing or pattern). This stage is all well-nigh proportions, and I'm looking at the heights and widths of absolutely everything!
My lines are less athwart and more curved hither: this happens naturally as I add together more lines and specify the class, which is why it's so important to get-go out with distinct angles.
A few of import notes at this stage:
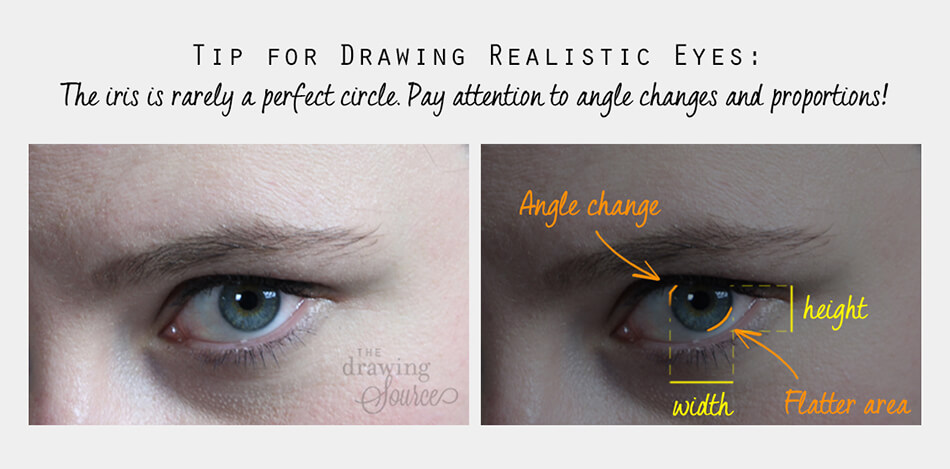
- Look at the shape of the iris: Is it a perfect circle? Not at all! The iris is rarely a perfect circle. Notice (A) the angle change at the top left, (B) the flatter area at the bottom, and (C) that the visible portion of the iris is wider than it is tall. If you want realism and naturalism, these specifics are necessary.
- Pay close attention to how much of the iris is covered past the top eyelid. Showing more or less of the iris can greatly change the expression of the eye.
How to Draw Realistic Eyes
Step 3: Filling in the Shadow Shapes
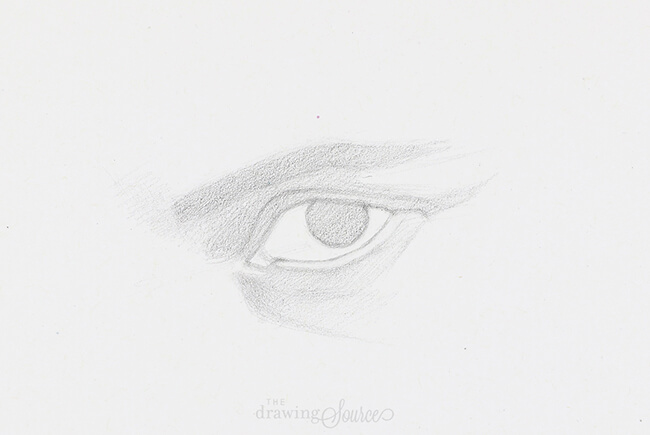
Next, I lightly fill in the areas of the eye that are in shadow. Reflecting on this phase, I could have too filled in the left-hand side of the sclera (the white of the eye).
Though what I am technically doing here is shading, the purpose of this step has more to do with checking my proportions than beginning the shading process.
Filling in the shadow shapes with a flat, relatively even value helps me to see where I have drawn incorrect proportions, and, subsequently, to correct them.
A note nigh proportions:
Looking at the post-obit infographic (which yous can download a full-size version of beneath), you lot tin can run across that I continue adjusting my proportions until the very finish of my drawing!
Get the full-size infographic past clicking here!
This is why information technology is and then of import to encompass the Proportion Stage of the drawing process – considering while we tend to give it our utmost attention at the beginning, we need to 'keep an eye' (*wink!*) on proportions throughout the rest of our cartoon as well.
Stay tuned for an upcoming form on developing your centre, manus, and the skills needed to depict accurately (and with niggling to no anxiety!)
How to Describe Realistic Eyes
Footstep four: Analyzing & Establishing the Value Structure
After I have lightly filled in my shadow shapes and adjusted my proportions, I turn my attention to shading, or rendering. My showtime priority is to establish my value structure: to decide where my light, one-half-tone and dark values are.
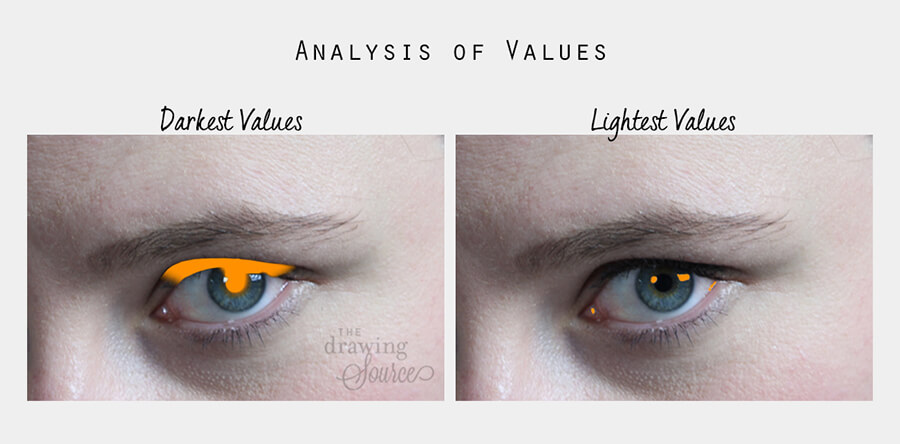
Determining the Value Extremes
Where are the darkest values in the scene?
The pupil and the upper eyelid surface area. Find that where the pupil meets the upper eyelid, nosotros tin't distinctly run across where one begins and the other ends. If I tin can't see a separation, I'm not going to create it in my drawing. In fact, separating them would only detract from the realism in this scenario.
Where are the lightest values in the scene?
The lightest values are the highlights that are establish on the edge between the pupil and the iris, in the lacrimal caruncle (corner of the centre closest to the nose), and in the far corner of the eye.
Notice that even the lightest part of the white of the eye is darker than these highlights!!
Though the sclera is referred to as the 'white of the eye', because it's a sphere it is rarely completely white. Information technology normally has a gradation and a range of values – hither especially, since one-half of it is in shadow.
Once I have determined the lightest and darkest values in the eye, I brainstorm establishing them in my drawing, knowing that the rest of the values are going to be somewhere between these two extremes.
Another of import aspect of this step is placing the pupil of the middle.
When doing so, I look closely at how much of the iris I can encounter on all sides of the student, and specifically where and how much of the pupil is covered by the upper eyelid. Irresolute this would, over again, impact the expression of the middle.
How to Draw Realistic Eyes
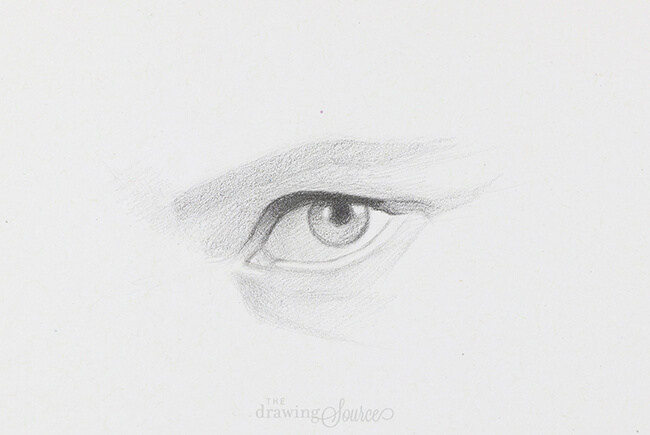
Footstep 5: Building up the Shadows
I am starting to build up the shadows in my cartoon.
Discover my approach to drawing the eyebrow: I am not cartoon individual hairs, or even thinking most drawing hair! Instead, I am drawing the general values of the surface area. The all-time way to arroyo cartoon the eyebrows is to squint at them, notice how much detail is lost, and to mass in the values that you see when you squint.
At the very cease of the drawing, you can indicate a few stray hairs, and that volition be plenty to create a naturalistic illusion of hair. Think to work from general to specific, and resist the urge to draw individual hairs this early on in the process!
How to Draw Realistic Eyes
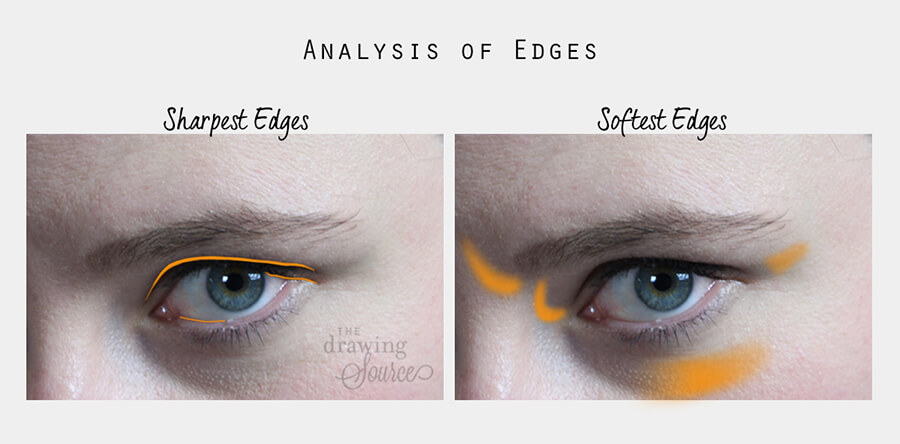
Step 6: Edges
As I continue to build upward the shadows, I outset to pay close attention to the border qualities throughout the heart. Unfamiliar with the concept of Edges? Sentry Lesson 6 of my free Mini-Class for a detailed video on this essential concept!
I determine where the sharpest and softest edges are in the scene, and brand sure to indicate them in my drawing. I then have ii extremes to compare the balance of my edges to.
How to Draw Realistic Eyes
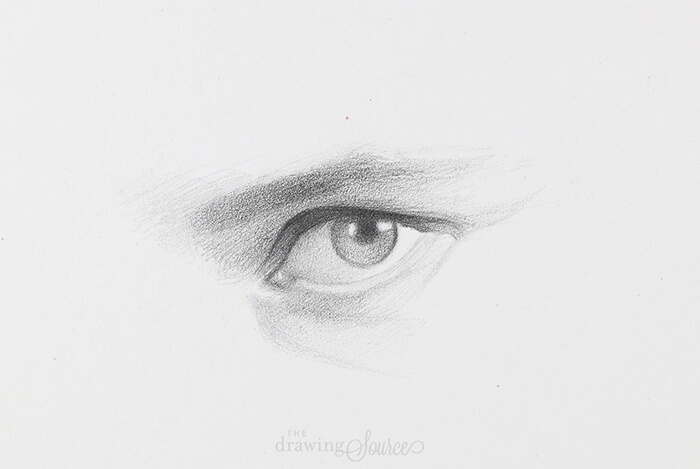
Step seven: Focusing on Nuances and Details
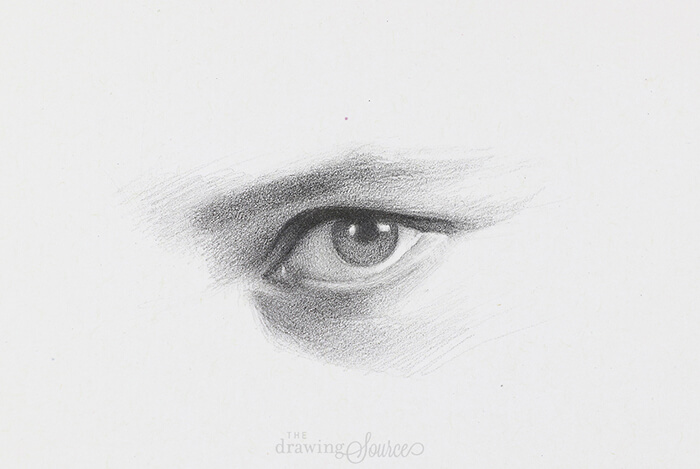
I've continued building upwards my values, and my cartoon is starting to expect quite realistic! Equally I gain confidence in my overall value relationships, I first focusing on smaller nuances in value and edge quality. More specifically, I am considering how to use subtle values and edges …
- to reinforce the structure of the eye that I illustrated at the beginning of this tutorial, and
- to continuously improve, or brand more than specific, the proportions in my drawing
Nuances that I'm paying attention to at this indicate:
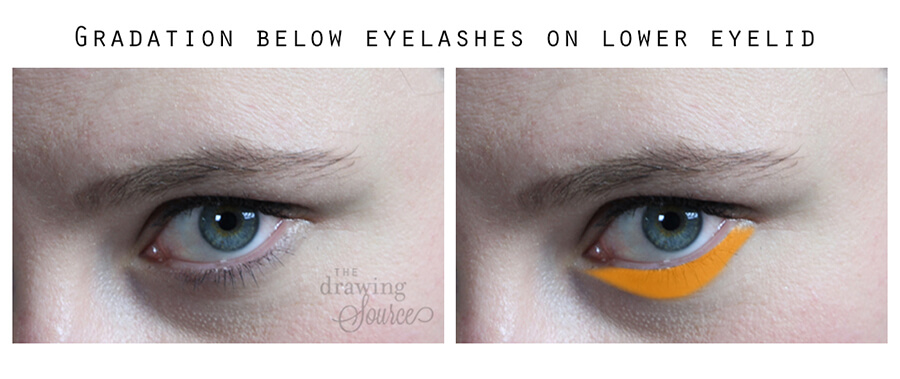
i) The gradation below the eyelashes on the lower eyelid.
Detect the subtle gradation nowadays in the front plane of the bottom eyelid (the plane that is facing us - run across the image beneath). It was essential that I drew in this gradation before drawing the eyelashes over top! The form underneath is much more of import to create a sense of depth, dimension, and realism.
Would this area look realistic with the gradation but no eyelashes? Absolutely. How about with the eyelashes only no gradation? Nope. The eyelashes are the 'icing on the cake', and are 1 of the last elements to consider when drawing an centre. This is a trap that many students fall into! Resist the urge to begin drawing in eyelashes and eyebrow hairs until the end of your drawing, when the eye as a whole is already looking realistic and dimensional.
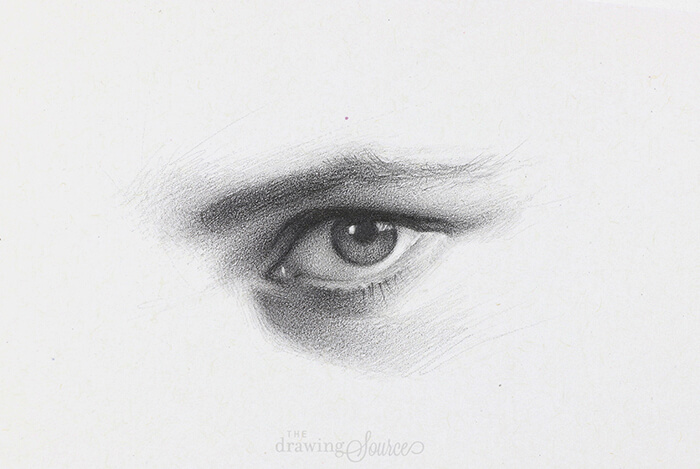
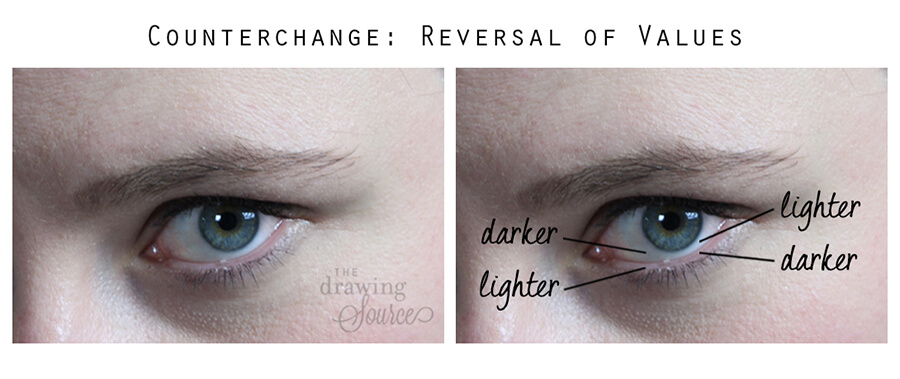
2) The counterchange, or reversal of values, in the sclera.
Looking at the peak plane of the bottom eyelid: observe that towards the left, the peak plane appears lighter than the sclera, and towards the right, the superlative airplane appears darker than the sclera. (See paradigm below.) This reversal of values is called 'counterchange', and is a beautiful moment that I absolutely want to emphasize in my drawing.
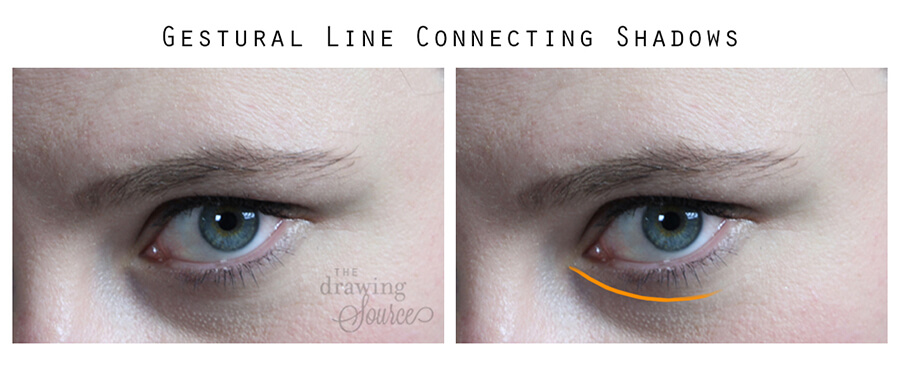
3) Implied, gestural lines connecting shadows.
Look how the line of the shadow beneath the tear duct/lacrimal caruncle area is picked up past the shadow indicating the bottom of the front airplane of the lower eyelid. (Encounter image below).
How to Draw Realistic Eyes
Footstep viii: Refining and Finishing
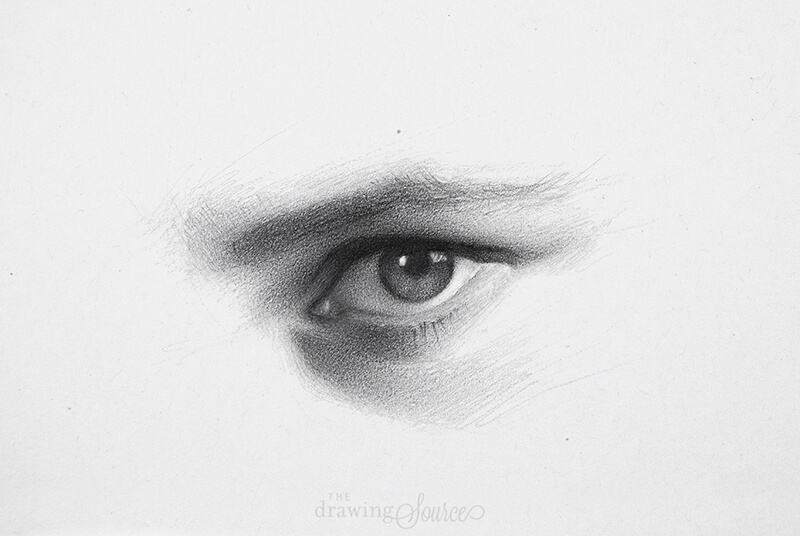 How to Describe Realistic Eyes: The Finished Eye Drawing
Comparing the previous stage of my drawing to this 1, the starting time thing that you'll probably notice is how much I darkened my shadows. Only afterward several 'passes' of incrementally concealment my values did I feel confident enough to create a pitch blackness value where the 'darkest night' values of my image are, and to sharpen certain edges.
You may likewise notice that I adjusted a few proportions! Mainly, I noticed that I had left a little chip too much room between the iris of the eye and the top of the lower eyelid. And yes, fifty-fifty though my drawing was well on its way to beingness finished, I took the fourth dimension to suit that proportion.
Furthermore, I slightly defined the inner corner of the eye. Though the lacrimal caruncle and tearduct are in shadow and are not particularly clear, I created the slightest bit more than definition to add some extra depth and create the illusion that the eyeball protrudes further out than the corner of the eye.
A Few Last Notes on How to Draw Realistic Eyes
Let's talk about the three areas of detail that many beginners get hung upwards on when learning how to describe realistic optics: eyelashes, eyebrows, and the fibres that radiate out from the pupil to the edges of the iris. (So, most of the minute details!)
The biggest mistake apropos these areas of detail is that students oftentimes address them too early. To create a realistic drawing, we need to address the whole earlier nosotros address the private parts.
It may likewise exist liberating to know that we don't actually demand to create cool degrees of detail in these areas to create a realistic cartoon!
On the reference of the heart that I'chiliad drawing, are whatsoever eyelashes fifty-fifty visible on the height eyelid? Barely! They are nigh completely in shadow. If I zoom in closely, I can see just barely brand out a few partial ones. That's it!
How about the fibres in the iris? Again, if I zoom in I can see them. All the same, if you are drawing a model from life, are you going to see the fibres from where you lot are sitting? Probably non.
My signal is: try not to get hung upwardly on these details. Instead, focus on the larger value relationships and gradations that y'all tin can see. Then, if you have fourth dimension in front of the model, if your drawing is large enough, if you lot tin meet that level of detail, and if your goal is hyperrealism, you tin can work on adding some of the effectively details to your image.
This concludes the tutorial, merely don't miss the bonuses below!
I hope you enjoyed this tutorial on how to draw realistic eyes!
What next?
The best way to improve your heart drawings is, unsurprisingly, to practise!
Why not download a reference photograph of the eye from this tutorial, the infographic to remind you of the steps, and get-go learning how to draw realistic optics today.
Downloadable Resources
Happy Drawing!
![]()
Enjoyed this page? Please share it!
Share buttons and pinnable paradigm beneath:

If yous enjoyed this page on how to depict realistic eyes, yous might as well be interested in ...
Related Pages
half dozen Most Common Middle Drawing Mistakes (and how to avoid them!)
How to Draw Eyebrows
How to Draw an Ear
Return to Portrait Drawing from How to Draw Realistic Optics
Return to Drawing Tutorials from How to Draw Realistic Eyes
Return to the Homepage from How to Draw Realistic Eyes

Source: https://www.thedrawingsource.com/how-to-draw-realistic-eyes.html
Posted by: mendozawailly64.blogspot.com
0 Response to "How To Draw A Realistic Eye Step By Step For Beginners"
Post a Comment